How to Make Beeswax Candles: Complete Guide for Beginners
Learn how to make beautiful beeswax candles from start to finish. Covers beeswax types, melting techniques, wick selection, troubleshooting, and tips for container and pillar candles.
Quick Answer
Beeswax is a natural, premium wax with unique properties that make it one of the most sought-after materials for candle making. Unlike paraffin or standard soy wax, beeswax burns cleaner, lasts longer, and naturally purifies the air. If you're ready to create stunning beeswax candles, our free candle wax calculator can help you determine the exact amounts you'll need for your projects.

Why Beeswax?
Beeswax has been used for candlemaking for centuries, and for good reason. When you choose beeswax, you're selecting a wax that offers multiple advantages over conventional alternatives:
Natural Air Purification: Beeswax candles release negative ions when burned, which can help purify the air by attracting dust and allergens. This is a benefit you won't get from paraffin candles.
Longer Burn Time: Beeswax has a higher melting point than most waxes, meaning your candles burn slower and last significantly longer—often 2-3 times longer than paraffin candles of the same size.
No Soot: Pure beeswax burns cleanly without producing the black soot associated with paraffin wax. This keeps your walls pristine and your air quality high.
Natural Scent: Beeswax has a subtle, naturally sweet honey aroma. Many candle makers love this inherent scent and choose to leave their beeswax candles unscented to preserve it.
Premium Appeal: The beautiful golden color, luxurious burn quality, and natural origin make beeswax candles premium products that justify higher prices in the marketplace.
Types of Beeswax
Not all beeswax is created equal. Understanding the different types available will help you choose the right material for your project:
| Type | Color | Scent | Melting Point | Best For | Price |
|---|---|---|---|---|---|
| Raw/Yellow Beeswax | Golden yellow | Strong honey aroma | 144-149°F | Container candles, unscented projects | Standard |
| White/Bleached Beeswax | Ivory white | Minimal scent | 144-149°F | Pillar candles, formal designs, fragrance blending | Higher |
| Beeswax Pellets | Yellow or white | Varies | 144-149°F | Easy melting, consistent melting | Standard to higher |
| Beeswax Sheets (Comb) | Golden yellow | Strong honey aroma | 144-149°F | Rolled candles, no-melt method | Standard |
Raw Beeswax retains the natural honey scent and golden color but may contain minor impurities. Bleached beeswax undergoes processing to remove color and reduce scent, giving you a blank canvas for fragrance oils.
Pellets are pre-processed into small beads for easier melting and more consistent temperature control. Beeswax sheets (also called honeycomb sheets) are the traditional choice for rolled candles and require no melting at all.
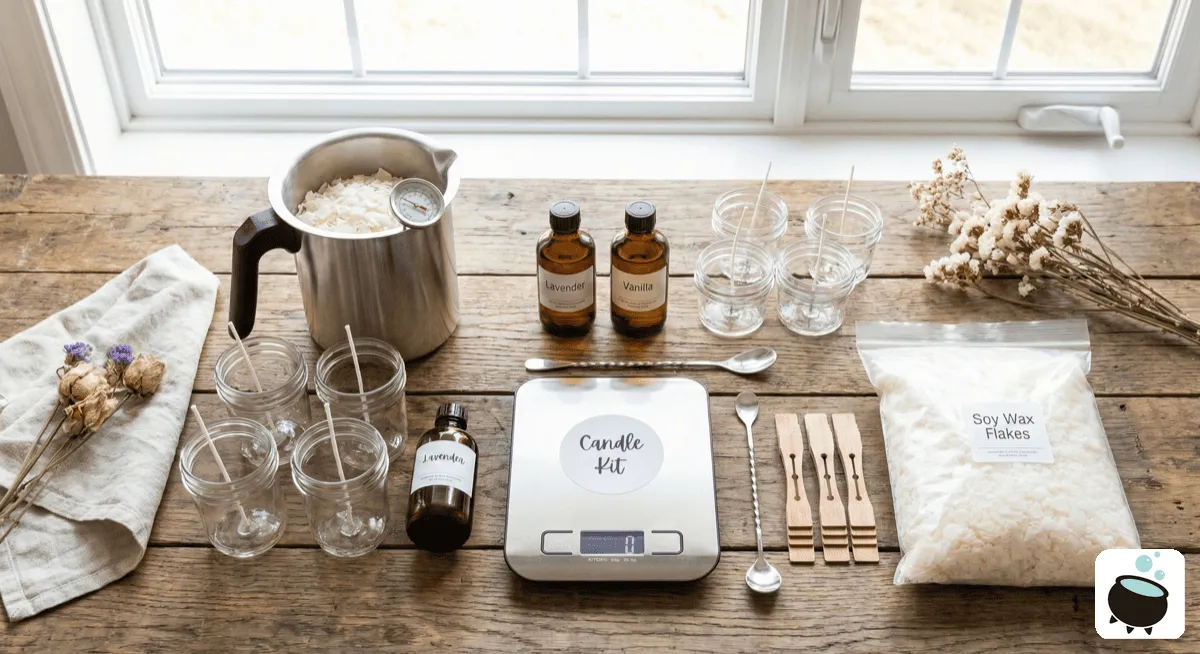
Essential Equipment for Beeswax Candles
Before you begin, gather these supplies:
- Double boiler or melting pot: Never heat beeswax directly over high heat. A double boiler ensures gentle, even heating.
- Thermometer: A candy or candle thermometer helps you monitor wax temperature and maintain proper pouring consistency.
- Wicks: Choose cotton or wood wicks appropriate for your candle diameter.
- Wick stickers or glue dots: These secure the wick to the bottom of your container.
- Containers or molds: Glass, metal, or silicone containers work well.
- Scale: For accurate ingredient measurement, especially when adding fragrance oils.
- Stirring utensils: Use wooden spoons or dedicated candle-making sticks to avoid contamination.
- Cooling area: A flat, draft-free surface where candles can cool undisturbed.
- Optional: Fragrance oils, color dyes, pouring pitcher with spout for cleaner application.
Step-by-Step: Beeswax Container Candles
Creating beeswax container candles is an ideal starting point for beginners. Here's the complete process:
Step 1: Prepare Your Workspace Set up your work area with all equipment within reach. Line your surface with newspaper or butcher paper to catch any spills. Beeswax can be sticky, so preparation is key.
Step 2: Secure the Wick Place a wick sticker on the bottom center of your container. Press your wick firmly into place. For extra security, you can use a wick holder or clothespin positioned across the top of the container to keep the wick centered during pouring.
Step 3: Measure Your Beeswax Weigh your beeswax pellets or chunks according to your container size. A general rule: you'll need approximately 0.9 ounces of beeswax per cubic inch of container space. Use our free candle wax calculator for precise measurements.
Step 4: Create a Double Boiler Setup Fill a large pot with water and bring it to a simmer. Place a heat-safe bowl or melting pot containing your beeswax into the pot (the bottom shouldn't touch the water). This indirect heat prevents scorching.
Step 5: Monitor Temperature Heat the beeswax slowly to 180-185°F. At this temperature, it will be fully melted and ready for pouring. Stir occasionally with a wooden spoon to ensure even melting.
Step 6: Add Fragrance (Optional) If using fragrance oils, add them when the wax reaches 170°F. Use 0.5 to 1 ounce of fragrance per pound of wax. Stir thoroughly for 2-3 minutes to distribute the scent evenly. Note that beeswax doesn't hold fragrance as well as paraffin, so expect subtle scents.
Step 7: Pour Your Candle Carefully pour the melted beeswax into your container, leaving approximately 0.5 inches from the top. Pour slowly to avoid air bubbles. Keep the wick centered as you pour.
Step 8: Cool and Cure Allow your candle to cool completely at room temperature for 24-48 hours. During cooling, you may notice a slight sink hole forming around the wick—this is normal and can be topped off with additional melted beeswax if desired.
Step 9: Trim the Wick Once fully cooled, trim the wick to 0.5 inches above the wax surface. This prevents excessive smoking and ensures an optimal burn.
Step-by-Step: Beeswax Pillar Candles
Pillar candles require a different approach since they must hold their shape without a container.
Step 1: Prepare Your Mold Use a silicone or metal mold designed for pillar candles. Secure your wick through the center using a wick holder or by threading it through pre-drilled holes at the mold base. Make sure the wick is perfectly centered—this is critical for even burning.
Step 2: Create a Mold Support System Place your mold in a container filled with sand, rice, or dried beans. This provides stability during pouring and helps the mold cool evenly.
Step 3: Measure and Melt Beeswax Calculate the volume of your mold and measure beeswax accordingly. Heat the beeswax in a double boiler to 190-200°F—slightly hotter than container candles to ensure the wax flows well into detailed molds.
Step 4: Pour the Candle Pour the melted beeswax slowly into the mold, maintaining steady pressure. Fill the mold completely to the top edge.
Step 5: Cool in Stages Allow the candle to cool at room temperature for 12 hours, then place it in a cool location (like a refrigerator set to 50°F) for an additional 12 hours. This staged cooling creates a more uniform density and reduces cracking.
Step 6: Remove from Mold Once completely cool, gently remove the pillar candle from its mold. If it resists, try warming the outside of the mold slightly or refrigerating it further to help contraction.
Step 7: Finish the Base Trim the wick and optionally seal the base with a hot knife or by carefully dripping melted beeswax to create a finished appearance.
Rolled Beeswax Sheet Candles
This is the simplest method and requires no melting at all.
Step 1: Select Your Sheet Purchase beeswax honeycomb sheets in your preferred size and color.
Step 2: Prepare the Wick Cut a cotton wick to the desired candle height, typically 8-12 inches.
Step 3: Warm the Beeswax Place the beeswax sheet in a warm room (70-75°F) or gently warm it with a heat gun on low setting for 10-15 seconds. Warm beeswax is more pliable and won't crack when rolled.
Step 4: Roll the Candle Lay the wick along the long edge of the warm sheet. Begin rolling the sheet tightly around the wick, pressing gently as you roll to ensure the layers adhere to each other. Roll all the way to the opposite edge.
Step 5: Seal the Seam Press the final edge firmly to seal the seam. The warmth of the beeswax and slight friction from rolling should create a secure bond.
Step 6: Trim and Enjoy Trim the wick to 0.5 inches and your candle is ready to burn. No curing period required—you can light it immediately.
Wick Selection for Beeswax
Proper wick selection is crucial for beeswax candles. Beeswax burns hotter than paraffin, requiring larger diameter wicks to control the burn rate.
| Candle Diameter | Recommended Wick | Notes |
|---|---|---|
| 2-2.5 inches | 6 ply flat braided | Standard for small containers |
| 3-3.5 inches | 8 ply flat braided | Most common container candle size |
| 4-4.5 inches | 10 ply flat braided | Wider containers, may need two wicks |
| 5+ inches | 12 ply flat braided or dual wicks | Larger pillars, ensure even burn |
| Rolled sheets | 3/8 inch diameter (hemp or cotton) | Traditional choice for sheet candles |
Braided wicks curl as they burn, creating a self-trimming effect. Cotton wicks work well for beeswax; wood wicks are trendy but require testing as they can be too slow-burning with beeswax's high melting point.
If your candle is tunneling (burning down the middle without melting the outer wax), you used a wick that's too thin. If it's smoking heavily or drowning in melted wax, your wick is too large.
Adding Fragrance to Beeswax
One common question: Can you scent beeswax candles?
Yes, but with caveats. Beeswax doesn't hold fragrance oils as readily as paraffin or soy wax. However, you can achieve subtle scents with these strategies:
Fragrance Load: Use 1-1.5 ounces of fragrance oil per pound of wax (compared to 0.5-1 ounce for paraffin). This higher ratio helps compensate for beeswax's lower scent-holding capacity.
Oil Selection: Choose premium fragrance oils designed for natural waxes. Some oils simply don't perform well in beeswax.
Scent Throw: Expect a more subtle scent throw, particularly in the cold phase. Beeswax scented candles often reveal their fragrance more fully when burning.
Blending Option: Many candle makers blend beeswax with soy or coconut wax to improve fragrance retention while maintaining some beeswax benefits.
Consider Unscented: The natural honey aroma of beeswax is genuinely beautiful. Many premium candle makers leave their beeswax candles unscented, letting the inherent fragrance shine.
Beeswax Blends
While pure beeswax is premium, blending it with other waxes offers advantages in cost, fragrance retention, and workability.
| Blend Ratio | Properties | Best For |
|---|---|---|
| 100% beeswax | Maximum burn time, natural scent, premium appeal, minimal fragrance hold | Luxury candles, unscented, pillar candles |
| 80% beeswax / 20% soy | Improved fragrance retention, lower cost, maintains most beeswax benefits | Scented container candles, premium mid-range |
| 50% beeswax / 50% coconut | Better fragrance throw, improved workability, economical, softer blend | Everyday scented candles, natural market appeal |
| 70% beeswax / 30% soy | Balanced approach, good burn time, improved scent, moderate cost | Versatile production, various candle types |
When blending, heat both waxes together to the same temperature before pouring. Ensure your wick is appropriate for the blend's burn characteristics—blended candles often burn slightly faster than pure beeswax.
Common Beeswax Candle Problems
Even experienced candle makers encounter issues. Here's how to troubleshoot:
| Problem | Cause | Solution |
|---|---|---|
| Tunneling (burning down the center) | Wick too thin, wax too hard | Use a larger wick, ensure proper first burn |
| Smoking or soot | Wick too large, wax too hot | Reduce wick size, lower pouring temperature |
| Sweating (oily beads on surface) | Temperature fluctuation, rapid cooling | Cool slowly, avoid temperature extremes |
| Cracking or frosting on pillar | Cooling too quickly, mold temperature variance | Use staged cooling, ensure even mold temperature |
| Wick keeps drowning | Fragrance load too high, wick too thin | Reduce fragrance oil amount, increase wick size |
| Candle won't release from mold | Mold too tight, wax bonded too firmly | Refrigerate mold, try warm mold exterior |
| Uneven color (for blends) | Incomplete mixing | Stir longer at melting temperature |
| Poor scent throw | Beeswax scent limitation, fragrance incompatibility | Accept subtler throw, test different oils |
Frequently Asked Questions
How long do beeswax candles burn? Pure beeswax candles burn 2-3 times longer than paraffin candles. A standard 3-inch container candle made from beeswax typically burns for 30-40 hours, depending on wick size and room conditions.
Is beeswax sustainable? Yes, when sourced responsibly. Beeswax is a renewable resource produced by honeybees. Choose suppliers who source from ethical beekeepers practicing sustainable farming methods.
Can I blend beeswax with paraffin? Technically yes, but it's not recommended. Paraffin is a petroleum byproduct, which contradicts the natural appeal of beeswax candles. Blending with natural waxes like soy or coconut is more effective and maintains your brand's integrity.
Why is my beeswax candle so expensive? Beeswax production is limited and labor-intensive. A single hive produces only 1-2 pounds of wax annually. Combined with beeswax's superior burn quality and premium positioning, higher prices reflect genuine value.
Can I use beeswax in a wooden wick? Wooden wicks can work, but beeswax is quite hard and burns hot. Standard wooden wicks may burn too slowly. If attempting this, test thoroughly and use thicker wooden wicks designed for harder waxes.
What temperature should I pour beeswax? Container candles: 180-185°F. Pillar candles: 190-200°F. Higher temperatures help the wax flow into molds and eliminate air bubbles, but excessive heat can cause discoloration.
How do I store leftover beeswax? Store in a cool, dry place in sealed containers. Beeswax is stable and won't spoil, but protect it from excessive heat, strong odors, and sunlight to preserve its quality.
Can I use beeswax pellets instead of sheets? Absolutely. Pellets are convenient for melting-based methods (container and pillar candles). Sheets are ideal for the rolled candle method. Choose based on your candle-making approach.
Creating beautiful beeswax candles is a rewarding craft that combines tradition with modern technique. Whether you're crafting for personal use or building a candle business, beeswax offers unmatched quality and premium appeal.
Ready to scale your production? PotionHub's candle-making software streamlines ingredient tracking, recipe management, and production planning so you can focus on creating exceptional candles. From calculating wax amounts to managing inventory and customer orders, PotionHub supports every stage of your candle-making journey.
Start your free trial today and experience the difference that purpose-built software brings to your craft.
Try These Free Tools
Skip the Manual Math
PotionHub calculates lye, tracks batches, manages inventory, and scales recipes for you. Free during beta — no credit card required.
Get PotionHub Free